

redacted.pdf you can safely share. You don’t have to know the values in advance; the extractor reads them off the document for you.
This recipe chains two endpoints covered on their own in the Extract quickstart and the parsing guide. Read those first if you want the detail on either call in isolation.
What We’ll Build
A script that:- Sends a document to
/v2/extractwith a schema describing the sensitive fields, and reads back their values. - Sends the same document to
/parseto get every word on the page with its bounding box. - Matches each sensitive value against the parsed words to find every occurrence, not just the first.
- Blacks out each match and writes a
redacted.pdfwith the underlying text removed.
Show the Full Script
Show the Full Script
Set
UNSILOED_API_KEY in your environment and save the document as document.pdf in the same directory before running.- Python
- JavaScript
redact.py
Step 1: Set Up Your Environment
Before writing any code, we need three things: an API key, a document to redact, and a few libraries for the chosen language.1.1 Get an Unsiloed AI API Key
To get API access, sign up on Unsiloed AI. Export your key as an environment variable so it stays out of source control:1.2 Pick a Document
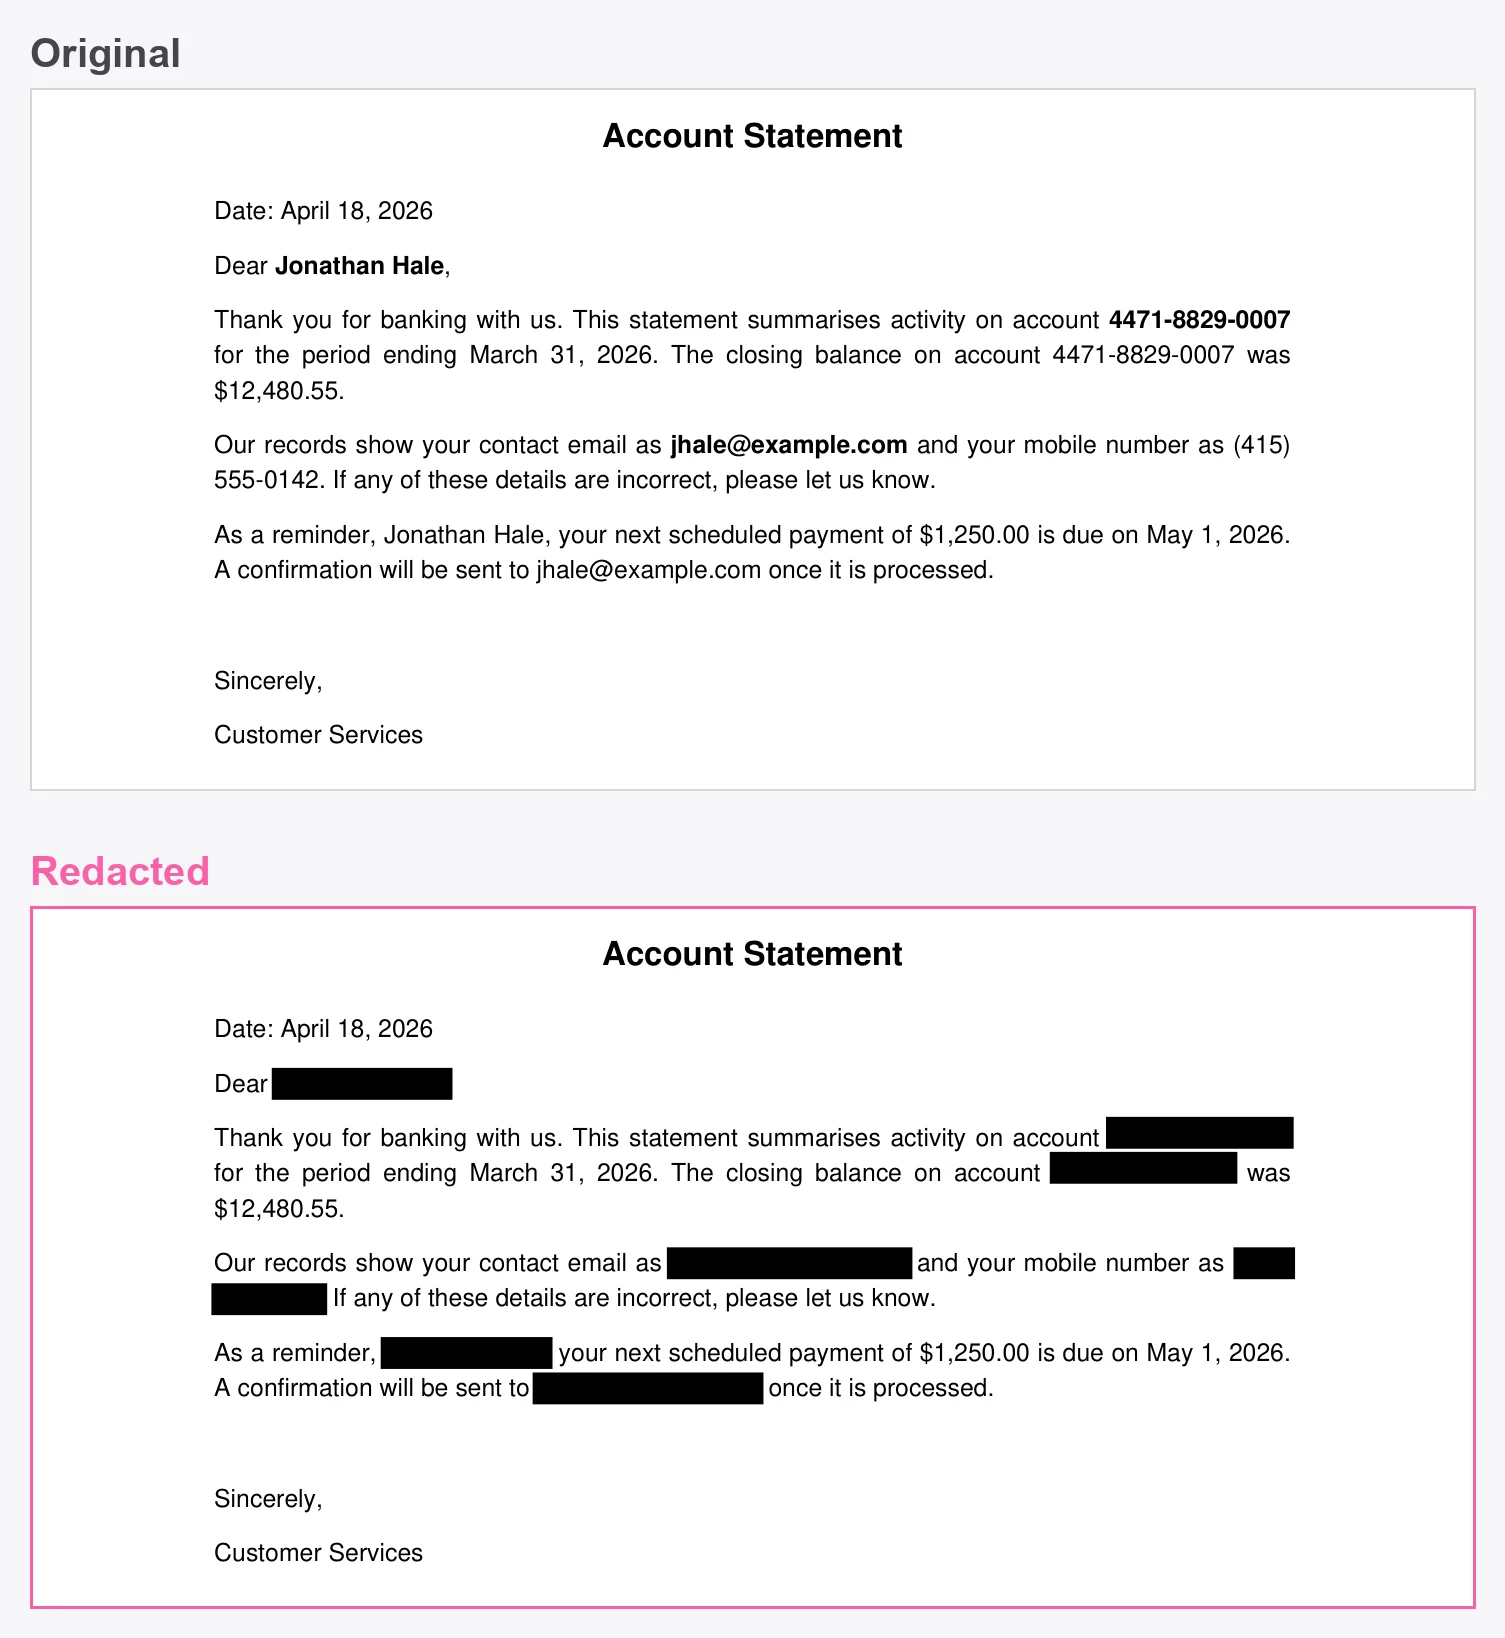
The walkthrough assumes a PDF saved asdocument.pdf in your working directory. To follow along with the exact output shown below, download our sample account statement: a one-page letter that repeats the account holder’s name, account number, and email so we can prove every occurrence gets removed, not just the first.
1.3 Install Dependencies
The API calls are plain HTTP, but writing the redacted file means rendering the PDF, so each language needs a couple of libraries.- Python
- JavaScript
You need Python 3.8 or newer. Install
requests for the API calls and PyMuPDF for the redaction:Step 2: Find the Sensitive Values With Extraction
We start with extraction rather than a list of search terms because we don’t want to hard-code the data we’re protecting. A schema describes the kinds of information that are sensitive, and the extractor reads the actual values off the document. Point it at a different statement and it finds that person’s details instead.2.1 Describe the Sensitive Fields
Each field is a name and a description. The description tells the extractor what to look for, so the clearer it is, the more reliable the result. We’re after four pieces of personal data.- Python
- JavaScript
Create a file called
redact.py with the configuration and schema:redact.py
2.2 Submit the Document and Read the Values
Both endpoints in this recipe run asynchronously: we submit a job, get ajob_id, and poll until it’s done. Since we do that twice, it’s worth a small helper. The extractor accepts completed as its done state; the parser uses Succeeded, so the helper checks for both. The failure side is just as inconsistent: a job can end up failed, Failed, or Cancelled, and the parser reports its reason in a message field where the extractor uses error. The helper covers all of those too, because otherwise a cancelled job would poll until the timeout and surface as a misleading “did not finish in time”.
- Python
- JavaScript
Add the polling helper and the extract call:
redact.py
result is an object with a value, so we pull out the values into a flat sensitive list. For the sample document, that prints:
Step 3: Locate Every Occurrence With Parsing
Extraction told us what is sensitive. It does not tell us where each value sits on the page, or how many times it appears. For that we parse the document. Parsing returns the page broken into segments, and within each segment anocr array giving every word along with its bounding box. That word-level detail is what lets us draw a box around each occurrence.
3.1 Parse the Document
Send the same file to/parse. Note the form field is file here, not pdf_file: the parser and the extractor use different field names. We leave ocr_strategy at its default auto_detection: it returns word-level ocr boxes for digital and scanned PDFs alike, and in our testing force_ocr degrades the geometry to line-level boxes, which makes redaction miss values.
- Python
- JavaScript
Add the parse call:
redact.py
3.2 Build a Flat List of Words
A word’socr box is given relative to its segment, so its position on the page is the segment’s top-left corner plus the word’s own offset. We flatten every word into one list, recording its normalized text, its page, and a box.
Two details matter for drawing clean boxes later:
- The reported word height is unreliable. Some boxes come back only a couple of pixels tall. The bottom edge,
top + height, sits on the text baseline consistently, so we store that baseline and reconstruct a full-height box from it in Step 4. - Parse boxes are in render pixels, measured against the rendered page that
page_widthandpage_heightdescribe. We keep each word’spage_widthso we can compute the exact pixels-to-points ratio when we redact.
- Python
- JavaScript
Add the normalizer and the word-collection loop:
redact.py
words is empty, so without it the script would still write a redacted.pdf with nothing redacted. A redaction script should fail loudly rather than produce a clean-looking file that leaks everything.
Step 4: Match Values to Their Locations
Now we find each sensitive value in the word list. A naive equality check breaks down quickly:4471-8829-0007 might arrive as one OCR token or several, an email keeps its @, and a phone number can wrap across a line break. So instead of matching word by word, we match by normalized concatenation. Starting at each word, we glue the normalized words together one at a time until the running string equals the normalized target, and stop early the moment it can no longer lead to a match.
4.1 Find Every Run of Words That Spells a Value
- Python
- JavaScript
Add the matcher:
redact.py
Step 5: Black Out Every Match
A run is a list of words. To redact it we need rectangles, and we need them to behave at two awkward edges: a value can wrap across a line, and individual word heights are unreliable. We handle both by grouping each run into lines and anchoring every box to the baseline we stored earlier.5.1 Turn a Run Into One Box per Line
We walk the run’s words, starting a new line whenever the baseline jumps or the text steps back to the left margin. For each line we take the horizontal extent from the words and a fixed band above the baseline (plus a little below for descenders).- Python
- JavaScript
Add the box builder:
redact.py
5.2 Remove the Text
This is where the two languages diverge, because covering text and removing it are not the same thing. A black rectangle painted over a PDF leaves the original characters in the file, selectable and searchable underneath. To redact for real you either delete the content or destroy it.- Python uses PyMuPDF’s redaction annotations.
apply_redactionsdeletes the underlying text and image data inside each box, then fills it black. The output stays a normal PDF, and everything outside the boxes is left untouched and still selectable. - JavaScript renders each page to an image, paints the boxes onto the pixels, and rebuilds the PDF from those images. Once a page is an image, there is no text layer left to recover.
- Python
- JavaScript
Add the redaction loop and save. We scale each box from parse’s render pixels back to PDF points using the ratio of Run it:
page_width to the page’s width in points. Deletion and drawing use different rectangles on purpose: apply_redactions removes any text that touches the redaction rect, even by a fraction of a point, so we shrink the deletion rect two points clear of the neighboring lines (otherwise a box can silently delete words from the line above or below), then draw the full-height black box as plain ink:redact.py
Step 6: Confirm the Text Is Really Gone
The point of redaction is that the data can’t be recovered, so it’s worth checking rather than trusting the visual. Openredacted.pdf and try to select the blacked-out text: nothing should be there. You can confirm the same thing in code by pulling the text layer back out of the result.
With Python and PyMuPDF:
REMOVED for every value, while the parts we didn’t target, like the closing balance and the dates, are still present and selectable:
Where to Take This Next
The schema is the lever here. Add fields for any other data you need gone, such as a date of birth, a postal address, or a national ID number, and the same pipeline finds and removes it. A few directions to take it further:- Redact signatures. Parsing labels handwritten signatures with a
Signaturesegment type, but only when you submit the parse job withlayout_analysis=advanced_layout_detection; the default layout analysis we use in this recipe never returns it. With that parameter set, you can black out each signature segment’s box directly, without an extraction step, since the segment already carries its location. - Handle scanned documents. Because the locations come from the parser’s OCR rather than the PDF text layer, the same script works on scans and photos, not just digital PDFs.
- Review before you ship. For a human-in-the-loop workflow, draw the boxes in a bright color first and have a reviewer confirm them, then switch to black once the set is approved.
Extraction
How schemas drive extraction, including nested objects and arrays.
Parsing
The full parse response, segment types, and word-level OCR boxes.
Element Types
Every segment type the parser can return, including
Signature.API Reference
Browse the full request and response specs for
/v2/extract and /parse.